How to Lower the Action on Acoustic Guitar? (Complete Guide 2025)

How to lower the action on acoustic guitar step by step guide

Why Guitar Action Matters?

Action simply means the distance between the strings and the fretboard. If its too high, your guitar feels like a workout (cant press strings easily). If its too low then sound of buzzing becomes your enemy.  What’s the sweet spot? A comfortable, balanced setup that makes playing effortless while keeping the tone crisp.

If you’ve ever struggled pressing down strings on your acoustic guitar or noticed buzzing sounds when you play, then you’ve already experienced the importance of guitar action.

In this guide, we’ll learn how to lower the action on an acoustic guitar without damaging your instrument. I’ll share not only the technical steps but also who should do it, why it matters, and how to do it safely at home (with a few pro tips).

This article is written for both beginners and intermediate guitarists, keeping it evergreen so you can come back to it anytime you need help with guitar setup.

What is Guitar Action?

Guitar action refers to the height of the strings above the fretboard. Typically measured at the 12th fret. Action plays a huge role in how easy (or hard) your guitar feels to play.

  • High Action: More difficult to press, but often better tone projection and less buzzing.
  • Low Action: Easier to play, but can cause fret buzz if not adjusted properly.

Note: The goal is to find the right balance for your style of playing.

Reasons to Lower the Action on Your Acoustic Guitar?

Lowering the action can transform your playing experience. Here’s why:

  1. Improved Playability – Easier fretting, faster chord changes, less finger fatigue.

  2. Better for Beginners – New players often quit because high action makes guitars painful.

  3. Faster Playing – Shredding, fingerpicking, and soloing become smoother.

  4. Customized Setup – Different players need different actions based on their style.

  5. Enhanced Comfort – If you play for hours, low action makes the journey enjoyable.

Who Should Lower the Guitar Action?
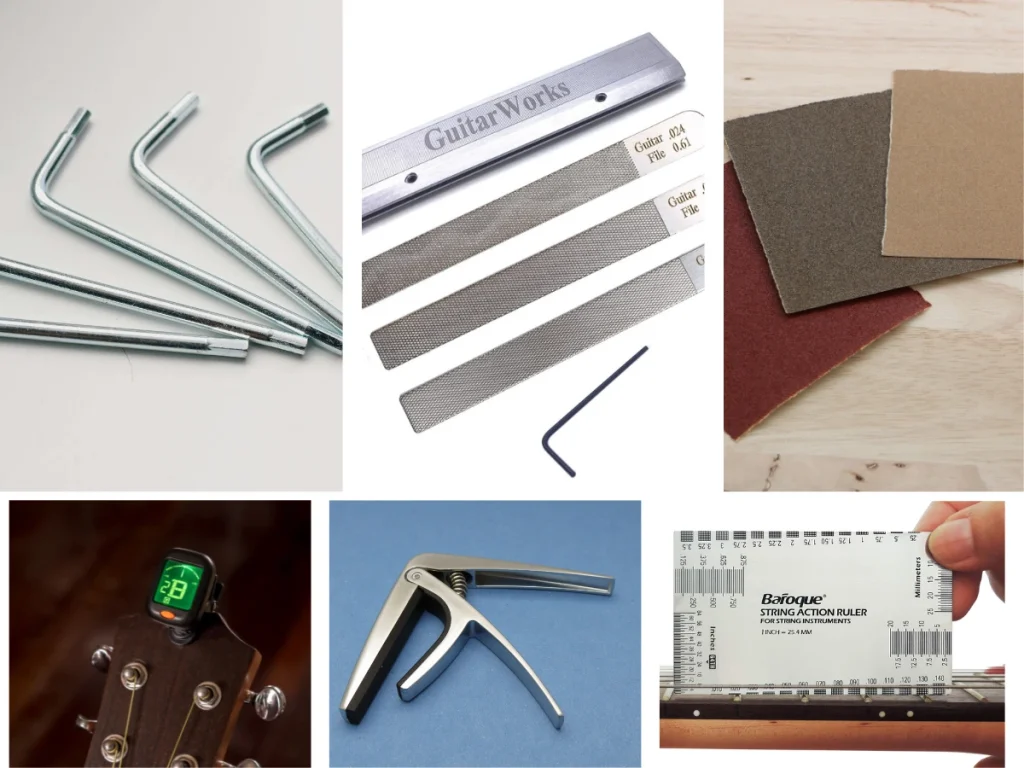
  • Beginners: If you’re struggling with chords, lowering action helps.

  • Fingerstyle Players: Lower action makes delicate playing more accurate.

  • Fast Lead Guitarists: Smooth solos require less resistance.

  • Anyone Experiencing Pain: High action can hurt your fingertips and wrists.

If you’re unsure whether you need to lower your action, simply measure it.

Required Tools:

Tools required to lower the action on acoustic guitar - truss rod wrench, ruler, sandpaper, nut files
Image credit: Amazon.com
  • Guitar tuner(If not possible you can use tuner app from playstore)

  • Ruler/string action gauge

  • Capo

  • Truss rod wrench (Allen key)

  • Sandpaper (220–320 grit)

  • Pencil

  • Nut files (optional)

  • Flat surface

  • Patience

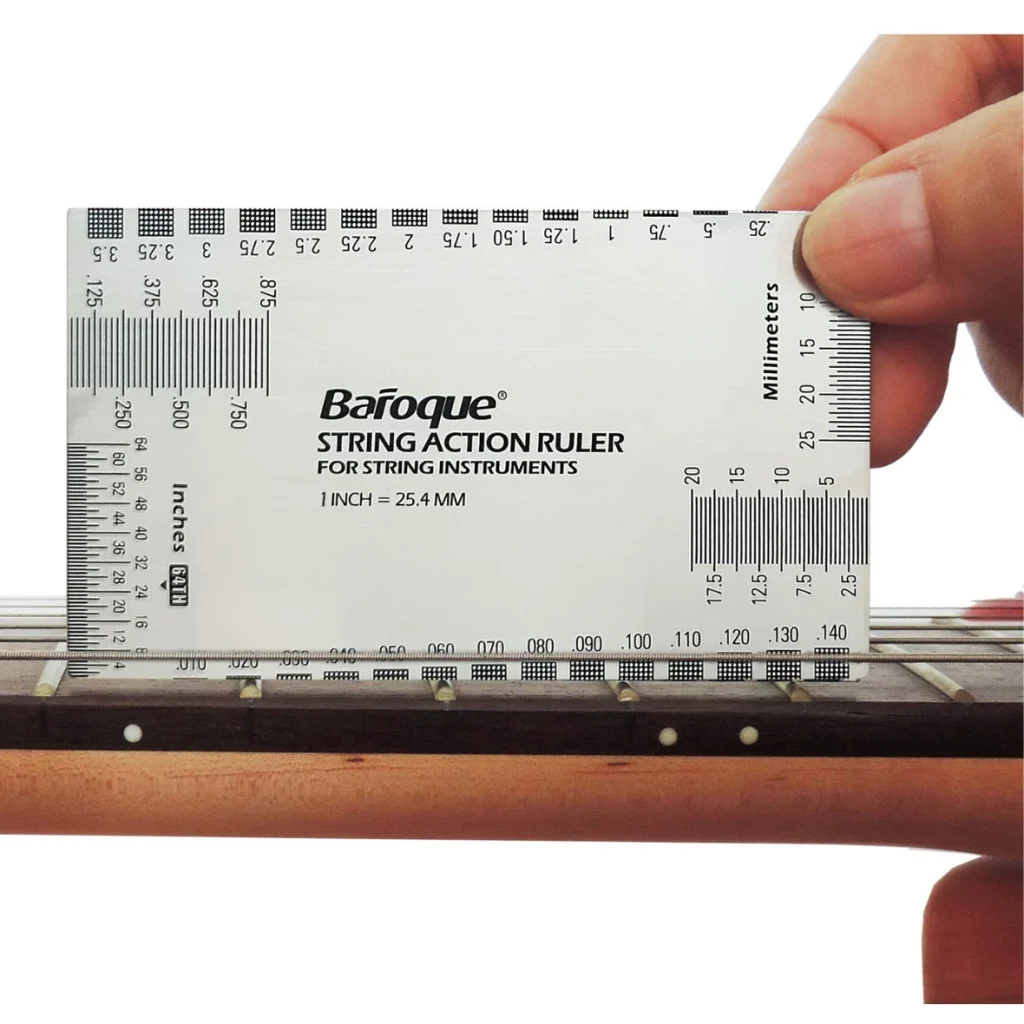
How to Measure Guitar Action?

Before adjusting, you need to know your guitar’s current action:

  1. Measurement Point: Measure at the 12th fret from the top of the fret to the bottom of the string.

  2. Standard Acoustic Action:

    • High E (1st string): 1.5–2.0 mm

    • Low E (6th string): 2.0–2.8 mm

If your measurement is higher than these values, lowering action is a good idea.

How to measure the action on acoustic guitar using ruler at 12th fret
Image credit: Amazon.com

How to Lower the Action on Acoustic Guitar (Step-by-Step)

1. Check Neck Relief (Truss Rod Adjustment)

  • What it is: Neck relief is the slight forward curve of the neck.

  • Why it matters: Too much curve = high action & too little = buzzing.

  • How to adjust:

    1. Locate the truss rod adjustment (usually at the headstock).

    2. Turn clockwise (tighten) to reduce relief = lowers action.

    3. Turn anti-clockwise (loosen) to add relief = raises action.

    4. Adjust only 1/8 turn at a time.

Caution: Don’t force the truss rod. If it’s too tight, seek professional help.

2. Lower the Saddle Height

  • What it is: The white piece at the bridge holding the strings.

  • Steps to do:

    1. Remove strings and take out the saddle.

    2. Sand down the bottom (flat) part of the saddle evenly.

    3. Re-insert and restring.

    4. Re-measure action.

Tip: Only sand in small increments. Once it’s too low, you’ll need a new saddle.

3. Nut Adjustment (Advanced)

  • What it is: The small piece near the headstock where strings rest.

  • When to adjust: If action is too high at the first few frets.

  • How to do it:

    1. Use nut files to carefully file each slot.

    2. Test string clearance at the first fret (should be just above the fret).

Mistake Alert: File too much, and strings will buzz.

4. String Gauge & Type

  • Lighter strings naturally lower action and make playing easier.

  • Heavier strings = More tension = Higher action.

  • Recommended: Try .010 / .011 gauge for comfortable playability.

5. Professional Setup

If you’re nervous about damaging your guitar, you can visit luthier. He can:

  • Adjust the truss rod

  • Sand the saddle

  • File the nut

  • Check intonation & overall playability

Cost is usually between $40–$80, but it’s worth it for precision and safety.

Common Mistakes to Avoid :

  1. Over-adjusting the truss rod.

  2. Sanding too much from the saddle at once.

  3. Ignoring humidity (which naturally raises/lowers action).

  4. Using the wrong tools (always use a proper guitar wrench & nut files).

Extra Pro Tips:

  • Humidity Control: Keep your guitar in a case with a humidifier. Wood expands/shrinks with humidity, affecting Guitar action. 

  • Consistent Checks: Action changes over time, so check every 3–6 months.

  • Play Style: Strummers may prefer slightly higher action but fingerpickers usually like it lower.

Conclusion - The Sweet Spot for Playability:

Lowering the action on your acoustic guitar can feel like getting a brand new instrument. You can play longer, faster, and more comfortably. Whether you do it yourself or take it to a professional, finding your action sweet spot is one of the best upgrades you can give your guitar.

Remember:

  • Adjust in small steps.

  • Prioritize balance over extremes.

  • Always measure before and after changes.

With this informative guide, you’re now equipped to take control of your acoustic guitar’s setup and enjoy a smoother, more inspiring playing experience.

Common Questions About Lowering Guitar Action

If you want to lower the action, you’ll need to tighten the truss rod by turning it clockwise. This reduces the neck’s forward bow, which lowers the string height. Always do this in tiny turns (about 1/8 of a turn at a time), and recheck the action. Never force it. If it feels stuck, visit a professional.
Most players find the sweet spot around 1.5–2.0 mm on the high E string (1st string) and 2.0–2.8 mm on the low E string (6th string) measured at the 12th fret. But it’s not one-size-fits-all. Fingerstyle players usually like it lower, while heavy strummers may prefer it slightly higher to avoid buzzing.
Yes, but not always negatively. Lower action makes your guitar easier to play, but if it’s set too low, you may hear buzzing or lose some resonance. As long as the balance is right, your guitar should sound just as good. Sometimes even better because you’ll play more confidently.
Absolutely, but with care. Simple adjustments like changing string gauge, sanding the saddle slightly, or a small truss rod tweak can be done at home. If you need nut adjustments or aren’t confident, it’s best to let a luthier handle it.
Yes. If the action is too low, the strings don’t have enough clearance and will hit the frets which cause buzzing problem . On the other hand, if action is too high, you won’t get buzz but the guitar will feel hard to play. The goal is to find that sweet middle spot where your guitar feels comfortable and sounds clean.

Jaxon

"Hi, I'm Jaxson, a guitar lover and writer. I share my passion for guitars through my blog, where I publish articles and tips related to this amazing instrument."

You may also like...